Sunday, April 29, 2012

Backup Panda

I decided to get a mate for my Panda.  


The new one on the left came with no chips in the case, but it did have about a twenty-five-year accumulation of cigarette smoke residue.  Fortunately, I was able to clean things up fine with some lens cleaning fluid.  I doubt the original owner was so lucky.


I'm going to try this custom viewfinder hood the next time I get out with the Panda.  I'm thinking having two Panda will also let me load slow and fast film.  Given the latitude of modern films, I should be ready for about anything.

Saturday, April 28, 2012

car show


I almost skipped the Cabezon Park car show this morning.  The world probably doesn't need more car show photos.  But, there was a nice, cloudy-bright sky to work with.  And, I had a new '50s plastic camera I needed to test.  So, there you are.


Tomorrow: the plastic camera.

Wednesday, April 25, 2012

nyc

The City of New York recently put over 800,000 historic documents and photographs on line.  The site immediately crashed due to the load of visitors, but you can get a preview of the offerings from the Madrid newspaper, El Pais.  A larger selection of images is available on the Atlantic In Focus page.


Most of the photographers were city employees; one of the best was Eugene de Salignac who documented the city, including the building of the great bridges, from 1904 to 1934.

UPDATE:
I was able to access the NYC image collection on May 1st.  It took a while to load the opening page, but the site then seemed perfectly responsive.  A search with the term "Salignac" turns up over seven hundred of his photos.

Sunday, April 22, 2012

A Warm Spring Day


Using TMAX 400 proved to be a good combination with the Argoflex Forty, giving me enough depth of field to keep everything focused along with adequate speed.  The film's great exposure latitude also dealt well with the contrasty light.  The only problem I encountered was with the proximity of the fastest 1/150 speed setting to the "B"; I bumped the lever and lost the last two shots on the roll.

Tuesday, April 17, 2012

128 Years

My grandfather George in the year of his birth, 1884.


This tintype of my grandfather was folded in half.  My guess would be that was done so that his father could carry the picture in his wallet.

The tintype provided a kind of "instant" photography print that was the most popular way of creating family photographic portraits in the U.S. for fifty years prior to the development of Kodak roll film at the end of the 19th Century.  A thin black-enameled iron plate was coated with a light-sensitive emulsion; the image recorded on the plate was a negative, but the black background made it look positive.  Itinerant photographers often made the tintype exposures in peoples' homes, and the plates could be processed in a few minutes.

Sunday, April 15, 2012

Street Photographer


I only recently came across the street portraits of Sheldon Levy on Flickr.  I'm obviously late to the game because he's posted 114 pages of photos spanning five years on the site.  It is worthwhile to start from the beginning of his photo stream to see how his style has developed over the years.  What you see is that he did more color in the past, and that he uses it very sparingly now.  He has also gotten much closer to his subjects, cropping out everything that is extraneous to the moment.  I would give a lot to watch this guy work the street for a couple hours.

Saturday, April 14, 2012

One more from the JEM JR.

I don't think I gained anything by taking out the cover glass from in front of the lens on the JEM box camera.  Film choice, processing and ambient lighting all seem to have more of an impact.  Rather than continuing to beat a dead horse, I think I'll just pass along what I've learned recently about the JEM JR. 120 for anyone else who might want to take up the cudgel.


The first thing you notice in the above photo will likely be the rather panoramic appearance; the camera has overly large frame rails which cut into the width of the 6x9 image quite a bit.  However, it is important to note that properly loading the film requires the leader to be placed against the back of the frame rails rather than threading it through the slots under the rails.  I tried that and got more area covered on the film, but that places the film plane about 2mm too close to the lens and cuts down sharpness.

Film unloading also requires some attention from the JEM user.  The film advance requires turning the key in a counter-clockwise direction.  That means that the film is wound onto the take-up reel against the curl of the film and backing.  When you go to take the film out of the camera you will find that it wants to spring outward, unwinding from the reel in the process.  So, one is well advised to remove the film from the camera inside a dark bag.

Other than film handling, the JEM is pretty much a standard, low-end box camera.  The slow shutter speed demands a steady hold, preferably braced against something solid. The lens obviously has a tendency to flare, so flat lighting of the subject is likely to yield more pleasing results.  With the addition of some red or yellow filtering it would be possible to use a wider latitude film like tri-x or tmax 400 which would help to keep the highlights under control.

Another possibility of filtering is that it might compensate to some extent for chromatic aberration -- that is, different wavelengths of light focusing in front or behind the film plane.  Not all simple lenses are made alike. Better quality ones had additives to combat aberrations and some even sandwiched two types of glass.  I'll give filtering a try next time I get some film in the JEM JR.

Friday, April 13, 2012

Shooting the JEM JR.

I shot a roll of TMAX 100 this morning in the JEM JR. 120. I had forgotten what a quirky camera it is.


There was a lot of flare to contend with in all the images from the JEM, and I had to make some considerable contrast adjustments to get anything usable. It occurred to me after the fact that a lot of the flare was probably being created by the cover plate in front of the lens; some improvement could likely be gained from removing the largely decorative glass from the front of the camera.  The real lens is quite far back behind the shutter, so it should actually be pretty well shielded from flare.  

There is a manual available on the Butkus site for the JEM JR., but it has quite a bit of misleading information about the camera's features.  The manual states that the cameras shutter speed is 1/25 and the aperture is a fixed f16.  It then suggests that ASA 50 film be used in bright sun; of course that is going to yield a stop over-exposure.  A warning is included that the photographer should stay at least six feet from the subject, but that is wrong as well.  As shown on any of the on line depth of field calculators, the hyperfocal distance for a 90mm lens at f16 is about 24 feet, with the closest sharp focus at 12 feet.  While the expectation was that images from the camera would only be destined for contact prints, it still seems very optimistic to expect anything to look sharp at six feet from the camera.

Monday, April 09, 2012

Sunday, April 08, 2012

Brilliant


When cameras got small enough to carry around about a century ago, manufacturers started fitting them with reflective, waist-level viewfinders.  The simplest type had a lens and a mirror which projected an image onto a small ground-glass screen.  That produced a rather dim look at the scene being photographed and was subject to interfering glare. On better quality cameras, the  ground-glass was replaced with a bi-convex lens which yielded a magnified and very bright view of the subject.  The nicest example of a brilliant finder I have is on one of my oldest cameras, a 1A Folding Pocket Kodak Special.


The nickel silver hood on the 1A finder protects the viewing lens surface in the closed position.  When flipped up from the back, the viewing lens is revealed and the hood helps to shield the lens surface from glare and reflections.  Lifting the hood from the front allows access for cleaning the inner lens and mirror surfaces. The viewfinder can also be swiveled 90 degrees to allow for either vertical or horizontal compositions.  Corner cut-outs help frame the view as appropriate for the camera's orientation.


While the brilliant waist-level finder provided a helpful preview of the image on film, the reversed mirror image was problematic for following action.  As film speed got faster and photographers sought more candid action shots, camera makers responded by producing medium-format instruments with both waist-level and eye-level finders.  Eventually, the waist-level finders disappeared, and with increased miniaturization, the eye-level finders -- particularly in 35mm cameras -- shrank down to minuscule proportions during the 1930s and '40s.


At around the mid-century mark there was a rebound in demand for brighter viewfinders, and one began to see bright eye-level finders with luminescent frame lines in 35mm cameras.  Medium-format manufacturers added fresnel screens to improve the brightness of their reflex finders on high end slr and tlr cameras.

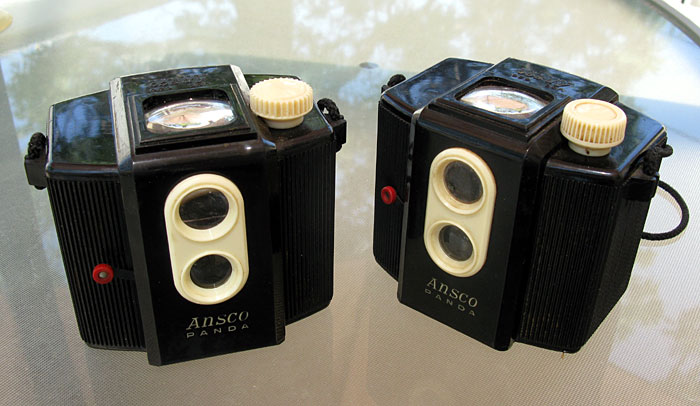
Meanwhile, the really dramatic development in viewfinder design was taking place at the mass market end of the spectrum as Kodak, Ansco and other makers introduced fixed-focus, plastic bodied roll film cameras sporting a picture window on the world.  Under the hood of the Fifties era box camera was a massive viewing lens that was four or five times larger than those in the brilliant finders found in the old box and folding cameras.  With the increasing availability of cheap, fast color processing and printing, people actually were getting a preview of what their pictures were going to look like before they snapped the shutter.


The convenience of the 35mm cassette ultimately overtook the advantages enjoyed by the cheap medium format roll film cameras, along with rapid advances in electronic automation of exposure and focus functions.    Of course, digital then came along and demolished the popular demand for any kind of analog photo technology.  Oddly enough, in the midst of the digital revolution, the brilliant viewfinder box cameras made a comeback when it was discovered that you could point your digital at the old box camera's viewfinder and get an interesting result that incorporated rounded frame corners, lens aberrations, and possibly some fungal smudges to produce images of imagined artfulness.  


For a time, there was quite a spike in the prices on ebay for box cameras with brilliant finders.  Luckily for those of us who are still interested in using the cameras with film, most of those through-the-viewfinder (ttv) artists have now moved on to creating digital images of a fantasized past with the iPhone's Hipstamatic app.  So, the chances are still pretty good that ten dollars plus postage will get you a great old camera with a brilliant viewfinder.


I have added a link in my web site page about the Argoflex  to instructions on how to restore the viewfinder to its original brilliance.

Friday, April 06, 2012

Fraternal Twins

I acquired the camera on the right some time ago, and it has made some nice pictures for me.  A small, intermittent light leak led me to buy another recently.  The Argus 40 seems to differ only in a few cosmetic details from the Argoflex Forty.  The second one had no light leaks, but the internal lens surfaces required some cleaning.  I partially disassembled the Argoflex while I was working on the new one and found that the middle lens element was a little loose in the mount.  We'll see if that was what was responsible for the light leak.


Meanwhile, the Argus 40 seems to be working perfectly.  The 75mm coated Varex Anastigmat is nicely sharp, and I very much like the tonal values it produces on TMAX 100.