Saturday, December 22, 2018
my lump of coal
I got a problem with my left eye for Xmas. I will suspend photography and blogging for a time. Saw three doctors and was told that I just need to wait it out. It seems mostly to be a problem of getting old. I'm told the solution to that is also to just wait it out. See you in the new year.
Thursday, December 20, 2018
Backup
Whatever camera I am using on any given day, there is usually also a backup camera that is small enough to ride along in a pocket. On this day I was coming back from shooting my Nikon FE along the river when I noticed three fire trucks parked a couple blocks from my house. I had used the last of a roll of TMAX in the Nikon, but I had a full roll of Fuji 200 in my little Vito II, so I used half that to shoot the fire trucks.


I finished off the Fuji 200 the next day on a walk through Old Town.


 If you are looking for a combination of compactness and quality it is hard to beat the Voigtländer Vito II. I have had several of these neat little folders and all have performed beautifully. My first Vito II took most of the pictures I made on a trip to Greece many years ago. The one I am shooting now has a Compur-Rapid shutter with a 1/500 top speed. All have had the marvelous Color Skopar 3.5/50 lens.
I recall some time ago reading that the Color Skopar lens was a recomputed 4-element-in-three-groups Tessar design. I had no reason to doubt that, but I never found any specifics about the design until recently when I came across an illustration comparing classic lens designs from that post war period which show that the Color Skopar does indeed have some significant differences from the contemporary Tessar and Xenar lenses. The Color Skopar (no. 9 in the chart) appears to have much larger elements in the rear group than the the other Tessar types. I shared that link in an email discussion with Kodachromeguy, the Urban Decay blogger, and he shot back with a link to the Patent for the Color Skopar by A. W. Tronnier filed in 1949 which begins:
In addition to the improved lens design, the Vito II is built very solidly and is easy to handle and shoot. The viewfinder window is nicely centered and close to the lens, so there is little parallax compensation required to get accurate framing. At one time I had an accessory rangefinder which could be fitted to the camera with a clip-on mount, but it seemed to me that it created more complications than advantages in use, and I have had no significant problems in properly estimating and setting the focus manually on the camera. I have had the opportunity to shoot some of the later Voigtländer models including rangefinders and slr types and and all made excellent images with their Color Skopars, but the little folding Vito II remains my favorite in the line.


I finished off the Fuji 200 the next day on a walk through Old Town.


I recall some time ago reading that the Color Skopar lens was a recomputed 4-element-in-three-groups Tessar design. I had no reason to doubt that, but I never found any specifics about the design until recently when I came across an illustration comparing classic lens designs from that post war period which show that the Color Skopar does indeed have some significant differences from the contemporary Tessar and Xenar lenses. The Color Skopar (no. 9 in the chart) appears to have much larger elements in the rear group than the the other Tessar types. I shared that link in an email discussion with Kodachromeguy, the Urban Decay blogger, and he shot back with a link to the Patent for the Color Skopar by A. W. Tronnier filed in 1949 which begins:
This invention relates to a new and improved four-lens photographic objective.Tronnier was one of those amazingly innovative and prolific designers of the early Twentieth Century whose work revolutionized a whole industry. In addition to the Color Skopar he was also behind a number of other highly regarded mid-century lenses including the Xenon, the Nokton and the Ultron.
One of the objects of the invention is to provide a photographic objective which shall provide minimum chromatic aberration, and which also provides minimum aberrations of other types, including minimum axial and non-axial aberrations, such as minimum spherical aberration, minimum astigmatism and minimum coma...
In addition to the improved lens design, the Vito II is built very solidly and is easy to handle and shoot. The viewfinder window is nicely centered and close to the lens, so there is little parallax compensation required to get accurate framing. At one time I had an accessory rangefinder which could be fitted to the camera with a clip-on mount, but it seemed to me that it created more complications than advantages in use, and I have had no significant problems in properly estimating and setting the focus manually on the camera. I have had the opportunity to shoot some of the later Voigtländer models including rangefinders and slr types and and all made excellent images with their Color Skopars, but the little folding Vito II remains my favorite in the line.

Sunday, December 16, 2018
The Best of the Bunch


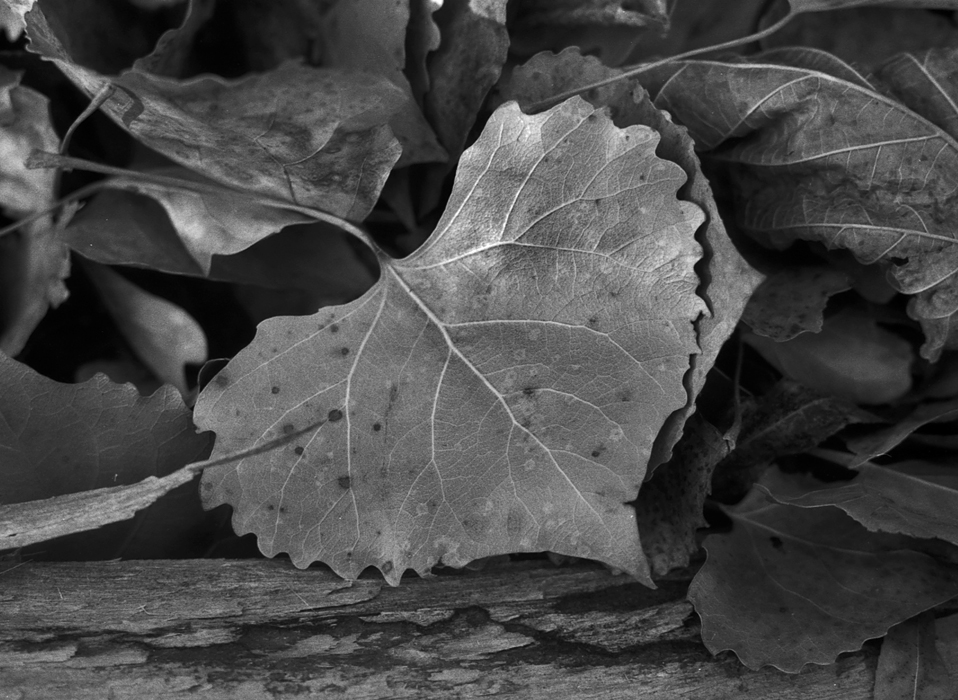
With half the roll of TMAX remaining the next day I mounted the Nikkor 1.8/50mm and took a walk beside the river. That turned out to be a less than fair trial for the camera and lens as I had Margaret's very active dog, Roxie, tethered to one arm. So, the equipment performed rather better than I did. Still, I saw a lot of nice subjects that I'll get back to again soon. The cottonwood forest is carpeted now with a dense layer of dry leaves. The river this time of year is full of migrating bird life. There were five Sandhill Cranes on a nearby sandbar when we stepped out of the trees. Two raucous ravens across the river drew my attention to a Bald Eagle perched high in a cottonwood's bare branches.

I processed this roll of TMAX in HC-110, dilution H. That formula uses half the dilution-B concentrate of developer and requires twice the time to develop. The outcome is a bit less contrast than one gets from dilution-B. It worked as expected, though better in some instances than others. I'm thinking that for the next roll of TMAX I'll try going back to dilution-B with a developing time of six minutes at 20C rather than the seven I have been using lately. The guides I always consult for this sort of thing are the HC-110 Developer Resource Page and the Massive Dev Chart.
Thursday, December 13, 2018
Where is that picture?

These days I develop both black and white and negative color, and the product of each roll of 35mm film gets cut into five-frame strips and, after scanning, they are stored in PrintFile Archival Preserver sheets which go into 3-ring binders. I also purchase the same brand for my medium format negatives. I get the PrintFile sheets in packs of 25 at the UNM bookstore for about a quarter of what they cost at normal retail outlets.
On the top of each PrintFile sheet I record the exposure date for the roll, the main subject, the camera, the film, and the developer used for the film roll.

On my computer I create a folder for each year. Within the year folders are sub-folders for each month of the year, and within those a folder for each of the dates of the scanned rolls. The specific roll folder titles, in addition to the date, has the same subject information as the PrintFile sheet and the camera name.

The information recorded in the file titles allow computer searches which usually lets me find the scanned images I am looking for and is also helpful in locating the actual stored negatives. All of this, of course, takes up quite a lot of space on book shelves and on hard drives. I save the initial scan as a tiff file, do an photoshop image in the same format, and then produce a final jpg image for on line display.
These days, you can find high-capacity drives which will likely hold a life-time of scanned images, but when I started out drive capacity was smaller and rather expensive, so I have three accessory hard drives full of images, and I just moved all my 2017 images to one of my laptop drives to make room on my main desktop machine.
In actuality, most of my image searches start out using the search feature on my blog. This is facilitated by the fact that each blog post is tagged with the same information that is recorded on the PrintFile sheets including dates, subjects and cameras. I have had the blog on line for twelve years, so that covers a good portion of my work. Some of my earlier photos are on line at several web sites such as PhotoNet, photobucket (ugh!) and Flickr, so those places get searched as well. All of this does not make for a perfect archiving system, but most of the times it works well enough as a supplement to my increasingly leaky wetware.
Wednesday, December 12, 2018
Sorting out cameras and lenses.

The X-700 underexposes compared to my Spotmatic by about a half stop with a normal lens and up to one-and-one-half stops with the 135mm telephoto. To further complicate matters, with normal lenses the X-700, the XG1 and the Spotmatic all seem to give the same exposure readings in subdued light. Some of this may be due just to differences in the metering systems, but I think the Minolta's auto-exposure system is a bit off. There may be some way to adjust the sensitivity of the meter, but I haven't come across any clues on the web about how that might be accomplished. Since the exposure error is pretty consistent with any given lens, the problem can largely be overcome by just adjusting the camera's ASA setting There is a bit of uncertainty that lingers in my mind, however, so I'm slowed down a little in my responses to photo opportunities.

A bigger issue for me with the combination of the X-700 and the 135 lens is that the aperture-priority auto-exposure system actually reverses my usual routine. With a telephoto mounted on my Spotmatic I first set the shutter speed to ensure that it will be fast enough to stop any subject or camera movement, and then I set the aperture to obtain the proper exposure using stop-down metering. With the X-700 I need to take a guess at what aperture is going to match the speed I want from the camera. What happens, sometimes, is that my guess is a little off and if I have failed to note the camera-selected speed in the viewfinder, my shutter might be a stop slower than is required for best sharpness. What is really at play is my own habits and routines which need to be adjusted in order to get the optimal performance from the camera system. It is also possible with the X-700 to set the shutter speed manually, which makes the system behave more like my Pentax Spotmatics.


Using the Minolta system has been a useful way to examine my own part in creating the images I want. As a photographer I have gotten into habits of manipulating the technology through a nearly unconscious learning process. It is easy to form preferences for certain gear as a result which have much more to do with my performance than with the capabilities of a particular camera system. My thought at present is that it will be useful to try a couple other cameras with lenses similar to Rokkor--QD. My later Pentax cameras, for instance, have aperture-priority metering, and I have a couple telephotos similar in characteristics to the Rokkor-QD.
Tuesday, December 11, 2018
Time Travel

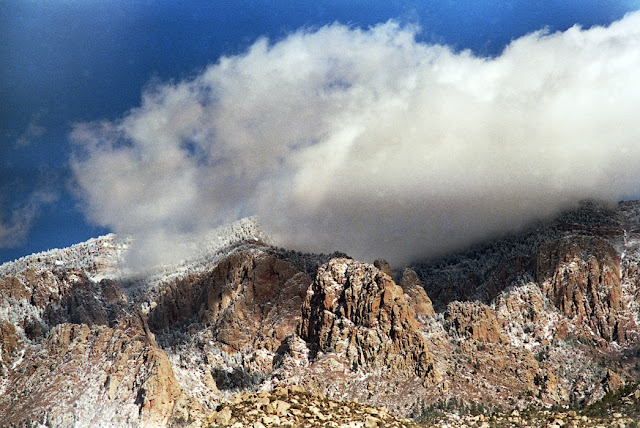
The distance between the basalt cliffs and the housing developments is perhaps better expressed in the dimension of time. The suburbs only go back decades, while the lava cap of the mesa was laid down around 150,000 years ago. Though that age predates human encroachment by well over 100,000 years it is still relatively young by geologic standards. The area between the small volcanic peaks and the escarpment's cliff face probably looks much as it did shortly after the lava cap was formed.

The slope below the rim is littered with great blocks of basalt which erosion has broken away from the face of the escarpment. Spaces between the boulders are packed with dried tumbleweeds and other vegetation which often conceals deep clefts. During the day one sees a few rabbits among the rock rubble while hawks glide noiselessly from one favored perch to another. A pair of ravens will usually swoop in to voice their displeasure at any intruders. Large rattlers are seen among the rocks frequently during the warm months, but in cold weather you can put your feet anywhere they will fit with only the risk of broken bones as a deterrent.

Although the litter and noise of the city is not far distant, little of that seems to reach the top of the cliffs. The prevailing silence and the dramatic jumble of sharp edged boulders instill a sense of an unbroken continuum of Time. Looking east you see the present and very recent past, while turning your gaze north, south or west shows you the world much as it was many millennia in the past.

Ancient rock art can be found all along the escarpment. The images were laboriously pecked through the patina of the hard basalt to provide a contrasting design on the dark surface. Most of the images date from the last few hundred years of occupation of the valley by Pueblo people, but a few go back thousands of years to the area's first inhabitants. Later arrivals during the last couple centuries have added religious iconography, graffiti and bullet scars.

Sunday, December 09, 2018

Saturday, December 08, 2018
Moving Along ...
I managed to properly adjust the infinity focus on the 135mm MC Tele Rokkor-QD. Much to my surprise, I was also able to screw in the front logo ring with no great difficulty.

I attached the lens to my yard sale Minolta X-700 loaded with Tri-X and took it to Cate's chess match. The dim florescent lighting forced me to shoot wide open at slow speeds, so it was not the best environment to show off the good quality the lens is capable of delivering. However, I thought the camera and the lens performed pretty well under the circumstances.


I like the 135mm focal length for this type of event. I am able to shoot with enough distance to avoid interfering with the action, and yet am able to fill the frame with the subject. I'm looking forward now to trying the lens under more favorable conditions.
Tuesday, December 04, 2018
It ain't pretty, but it works
I was thinking it would be nice to find a telephoto lens for my yard-sale Minolta X-700 when I came across an about-to-expire listing on eBay for an XG 1 and a 135 Rokkor for $12. The "as is" labeling did not inspire great confidence as evidenced by the lack of bids, but it seemed worth a gamble at that price.
 The camera turned out to be in pretty good shape. A couple hearing aid batteries and a few drops of Ronsonal in the motor wind port got everything working properly, including the aperture-priority auto-exposure. The lens is an MC Tele Rokkor-QD f:3.5/135. Turning the focus or aperture rings produced no adjustment of those functions.
It seemed there was little to lose by opening up the lens to see what might be fixed. However, I was brought up short when applying my lens spanner to the faceplate ring as the forward tube had a dent in it. The thing just wouldn't budge. Given that, I decided to fall back on the Red Green protocol: Get a Bigger Hammer. I got out my electric Skil drill and a small bit and bored a couple holes in the stuck ring. I then applied a heavy steel pair of dividers and a vice-grip plier to the task. With considerable grunting and straining and not a few scratches to the ring, I finally got it screwed out.
Yes, yes; I am aware of the grimaces and eye rolling going on there in the back rows.
Any way, there is a pretty good YouTube video on the disassembly of the lens. It is fast-paced and I needed to replay parts of it several times in the process to get the lens fully disassembled and then put back together. I did get the focus ring turning, and the aperture settings and dof preview button work as they should. Unfortunately, the video left out the details of how to properly set infinity focus and I haven't yet figured that out for myself, so the distance and dof scales on the lens do not match up with the actual focus. On a rangefinder system that would be a fatal flaw, but with an slr you see what is registered at the focal plane regardless of what the focal index indicates. So, I decided to take the lens and the camera for a test drive, sans faceplate ring.


I'll likely take the lens apart again and see if I can sort out the focus adjustment, in which case I would also jam the filter ring back in place. Without the ring installed the camera under-exposes a couple stops. I'm not sure then how much I would use the lens, but I am impressed by its performance so far. The lens is very compact compared to more modern telephotos and nicely fits the light-weight XG 1 and the X-700 as well. I'll keep a lookout for one with a slightly bigger aperture which would improve viewfinder visibilty. Meanwhile, I think I've gotten my twelve bucks worth.
Subscribe to:
Posts (Atom)