Showing posts with label Kodak No.2 Folding Autographic Brownie. Show all posts

Friday, February 11, 2022

More work for the Brownies

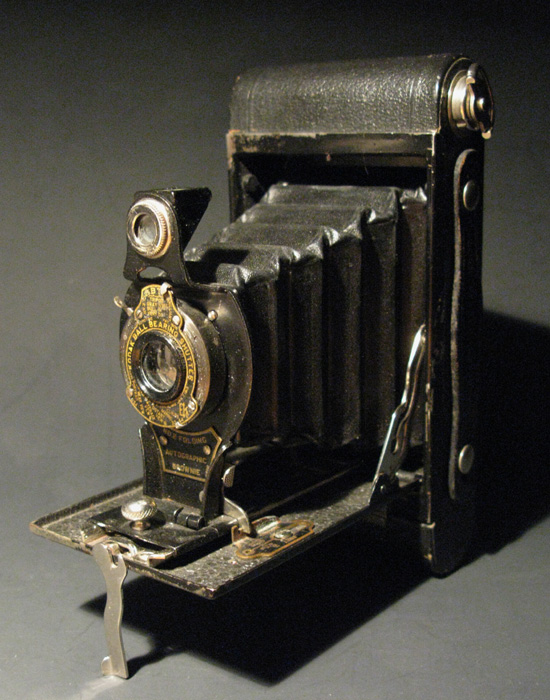
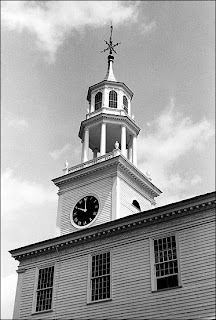
We took a walk around the neighborhood with the Kodak No.2 Folding Autographic Brownie.

Kodak applied the Brownie name to quite a variety of cameras.  This was one of the more capable ones with zone focusing and multiple shutter speeds and apertures.  The Rapid Rectilinear lens is quite good.

The Henry Mann House is just across the street from our place.  It was built in 1905.  The heavy wooden gate is a block north of us next to a big adobe brick house that also looks to be quite old.


Wednesday, January 17, 2018

Brownie

I took a walk by the river today with one of my old Kodak Brownies.  These folding Kodaks can be a challenge to shoot unless one spends some time becoming accustomed to the camera's features.  The weakest point for the user is the tiny reflex finder which provides only a dim suggestion about what is in front of the camera.  My answer to this is to tape a simple open frame finder from another camera on the handle side of the camera.

The other main barrier to overcome in using this No. 2 Folding Autographic Brownie is the rudimentary distance scale with settings (in feet) limited to "8", "Fixed", and "100".   With a focal length around 90mm those values are adequate for bright lighting and small apertures, but dim light calls for some practiced guesswork.

The camera, however, does have a couple redeeming features which outweigh the inconveniences.  Perhaps the biggest strength is the 6x9 image format on 120 roll film.  Putting even a very simple meniscus lens in front of a piece of film that size produces and image that can rival that made with the best of  35mm camera glass that money can buy.  As it turns out this Brownie is equipped with an old but excellent lens, a Rapid Rectilinear, the design of which dates back to Civil War days.

Also known as the Aplanat, the Rapid Rectilinear lens has two cemented doublets in symmetrically opposite positions on either side of the shutter's aperture.  The result of that arrangement is an image that is very sharp across the frame and with no apparent linear distortion.   Many of the best quality Kodak cameras of the early 20th Century were equipped with a Rapid Rectilinear, and a lot of the early photography luminaries including Edward Weston used the lens on their view cameras.


Judging from the results I got from my recent outing with the Brownie, I'm clearly out of practice with this camera.  I thought this one picture of a footbridge over a side channel of the river did show some of the surprisingly nice qualities in the images which the camera can provide.


I'm hoping to find the time and opportunity to use this folder and several other old Kodaks more often.  I've never made any portraits with my folders, and I think they could be very interesting to attempt.  I would also like some time to have the opportunity to put a Rapid Rectilinear on a camera with ground glass focusing to enable further exploration of the unique character of this classic design.

Monday, August 22, 2016

Kodak No.2 Folding Autographic Brownie

There are several cameras in my collection that I like very much, but none have taught me more about the art and craft of photography than this modest little Kodak No.2 Folding Autographic Brownie. I acquired two of them some years ago. Up until that time, I had very little interest in the old Kodak folders that seemed rather awkward looking and unpromising in terms of capacities. The first one I got was a gift from a friend who had lost his home, most of his cameras and his life's work in photography in a fire. The Brownie survived the fire in a shed, but only barely; when I got it, the outer case was falling apart, and the insides were covered with rust.

Oddly enough, the Brownie's lens, shutter and bellows seemed fine. I cleaned up the thing as best I could and put a roll of 120 film through it. I had little expectation of getting interesting photos from it, but I thought my friend might like to see something come from one of the few surviving cameras. To my surprise, the images were quite sharp and had a great depth of tonality. A close examination of the outer rim of the lens showed it to be a Rapid Rectilinear. That was a lens popular early in the Twentieth Century with the f64 Group, and used by people like Adams and Weston. While the uncoated lens does impart a particular character to the tonal quality of images, I decided that the large 6x9 negatives were probably the main influence on the richness of the tonality that came from the camera. I had seen something approaching that from some of my previous box camera images, but the combination of tonal range and sharpness from the Brownie was a real eye opener.


One thing that took me a while to understand was that the aperture values on the shutter were not what they seemed. It is a rather odd progression: "U.S. 4 8 16 32 64". It turns out that is the Uniform System used on some of the early Kodaks. The present-day standard for aperture stops expresses them as a ratio of aperture to focal length; so we get something like 8, 11, 16, 22, 32 with each increment indicating half or twice the exposure. In the Uniform System, the "16" expresses the same exposure value as the "16" in the current f-stop system, but the numerals above and below are simply doubled or halved to indicate the corresponding exposure change, rather than the proportional or ratio expression of the current system. The relationship between the two systems is perhaps most easily understood by looking at a comparison table like the one available on the Kodak Classics site.

Another oddity of the exposure values on the shutter's face is the wording attached to the numeric values, terms like "Clear", "Brilliant", "Distant View", "Marine", "Clouds". This was Kodak's Autotime Scale, an exposure system intended to assist the amateur photographer in choosing the proper time and aperture settings based on lighting conditions and subject matter. The system depended on the fact that film speed choices were very limited in those days, and it seems now to be more quaint than practical. In any case, once you understand the relationship of the Uniform System exposure values to present-day usage, it is possible to ignore the wordy jumble and proceed as you might with any camera.

Since the top shutter speed on the Brownie is 1/50th of a second, a tripod is good insurance, though not absolutely necessary if you are careful not to jiggle the camera during the exposure. Even when hand-holding the camera, I have found it useful to use a cable release in order to avoid the need to manipulate the release lever out on the end of the long bellows. Given the large negative format, there is no real penalty in terms of grain in using 400-speed film which permits small f-stops and good depth of field, along with superior tonal rendition.

My friend's Brownie wasn't really a very practical shooter because of the damage it had sustained, but I decided I needed to do something to to further explore its capabilities. I therefore purchased a nearly identical camera on line for about five bucks that had a simple meniscus lens. It was no great feat to transplant the Rapid Rectilinear and its ballbearing shutter to the newly acquired camera body. It took me a few rolls to sort out the best ways of using the Brownie, but in the end I got photos from it which I think are among the very best I have made over the years.

I have since acquired a fair number of Kodak and other folders with more advanced capabilities and more complex lenses than that on the Brownie, but I don't honestly think they have made better pictures for me.

Some sample images from the Kodak No.2 Folding Autographic Brownie:


Tuesday, May 31, 2011

Kodak's Autotime Scale


One of my favorite Kodak cameras is the little No.2 Folding Autographic Brownie. It makes very fine images thanks to the excellent two-element Rapid Rectilinear lens. It also sports a curiously complicated dial on the shutter front in which the numeric speed and shutter settings are supplemented by words describing light conditions and subject choices. The key to this wordy mosaic is to be found just above the words, "BALL BEARING". There will be found the name Kodak gave to the exposure system incorporated in the shutter face, "Autotime", and the Patent date of 1908. Using the "Autotime" name in a web search turns up quite a few early Twentieth Century ads from photography magazines along with historical notes on the details of the Autotime exposure system.

Kodak's directions for obtaining correct exposures using the Autotime dial was to use the speed settings at the top of the shutter to select the prevailing lighting conditions, the possibilities being "Brilliant", "Clear", "Gray", "Dull" and "Very Dull". Once a selection was made from those choices, the photographer was then instructed to move on to selecting the aperture designated as subject choices at the bottom of the shutter dial, with the possibilities being "Portrait", "Near View", "Average View", "Distant View", "Marine", and "Clouds". It was also explained that subject movement and depth of field considerations would also require additional adjustments. All of this, according to the Kodak ads and instructions, would result in an "automatic" indication of the proper exposure settings. That seems now like comical advertising hype, though perhaps a little less so at the time when popular photo magazines were providing exposure determination explanations which included the calculation of logarithmic exposure scales.

The original 1908 patent application (883607) for the Autotime Scale shows that it was not a Kodak invention. An American living in London, Frank S. Andrews, actually thought up the system, and his concept included some real automation which was not carried over to the Kodak product which first appeared on its cameras in 1909. Andrews did lay out the design to include the terms for light conditions and subject choices, but he also described a mechanical geared linkage between the aperture and speed settings for automatically maintaining the proper exposure when the speed was changed to adjust for subject movement, or when the aperture was altered to change the depth of focus.

Kodak's implementation of the Andrews design did not include any mechanical alterations of the shutter or aperture mechanisms. It was up to the user to make a determination of the lighting conditions and to apply that observation to the shutter and aperture manually. The Autotime Scale came installed on a number of Kodak models including the very popular Vest Pocket series which used 127-format film. The Scale could also be installed as an after-market accessory at a cost of $1 to $1.50, depending on the type of shutter. It is hard to tell at this remove how many users actually made practical use of this feature, as was also true of the Autographic feature which was offered on many of the same cameras. The company's stated aim was always to make photography more accessible to the common man, but there were also sub-texts about differentiating products from the competition and selling more cameras.

The novelty of the Autotime Scale did not pass the test of time in a very competitive market and was eventually abandoned along with the Autographic feature. Playing a role in in the demise were the establishment of the modern f-stop system of aperture designation, the availability of a wider range of film speeds, and a generally higher level of sophistication in camera design and construction. However, that was not completly the end of the Autotime idea.

In the 1950's the coupling of aperture and speed settings was resurrected by Kodak in its Retina line of compact 35mm cameras. In my Retina IIc, the shutter and aperture rings around the lens mount are latched together in such a way that incrementing the speed setting by one stop will automatically increase the aperture to maintain an equivalent exposure. This was part of an industry-wide introduction of the Exposure Value (EV) system which assigned a single value to designate a setting of aperture and shutter speed to produce an exposure of film appropriate to lighting conditions and film speed. This was made possible in part to the wide-spread use of exposure meters calibrated to the EV system and often connected directly and automatically to the cameras' shutter and aperture adjustments.

Friday, March 04, 2011

A New England Sampler


I was treated to a fine tour through New England in 2006 thanks to Margaret and her brother, Jim, who lives there six months of the year. This Sunday Slideshow is brought to you courtesy of some of my favorite old folders and a couple fine little 35mm cameras listed below.

Saturday, January 16, 2010

borders and sprockets

I went to some trouble, as I described in my last post, to eliminate the sprocket holes from my Fed-1g images. On other occasions I have done just the opposite, incorporating into my images the film negative borders with their lettering and numerals or the sprocket holes from 35mm film. I think the first time I used this style was in an image made with my No.2 Folding Autographic Brownie. I decided I wanted a very large print to hang over my desk, so I took a scan of the image to a fellow in the Las Cruces downtown mall who had an Epson printer about two yards wide. As he was preparing the image for printing, I saw him start to crop out the film borders. I hastened to tell him I wanted the borders left in the print. He gave me a quizzical look, and I muttered something about the framing effect. So he proceeded as directed with only a slight curl of the lip.


Kodak No.2 Folding Autographic Brownie

It is not immediately apparent to everyone why including the film borders and sprocket holes into an image is a good idea. I think the creation of a natural framing device is part of the appeal. The border inclusion also calls attention to the photographic process and further differentiates the image from those created by other means such as painting or drawing.
    In the case of my No.1A Autographic, the negative frame borders also document the panoramic format which results from using 120 film in an old 116-format camera.


Kodak No.1A Folding Pocket Special

I think another aspect of appeal in the use of negative frame borders resides in a declaration of authenticity. One sees that the entire image recorded by the film is displayed with no cropping. I'm usually perfectly willing to crop for compositional value, but it is nice to have an example or two from an old camera which clearly show the unaltered proportions of the images.


Ansco Folding Buster Brown

Negative frame borders are sometimes useful in identifying the type of camera that has made the image. For instance, the film holders for large-format cameras leave a very distinctive impression on the film. The upside-down lettering at the bottom of the images from both the Buster Brown and the Clack result from the fact that the advancing film travels from right to left.


Agfa Clack

The Certo Dolly is a particularly versatile shooter, offering two formats, 6x6 and 6x4.5, and one can further emphasize the proportional possibilities with inclusion of the frame borders in the images.


Certo Dolly Supersport, 6x4.5 mask

Although the Dolly is built to use 120 film, it is also easily possible to use 35mm film in the camera. The 35mm cartridge fits with no problem into the feed compartment. One needs to be careful to keep the ruby windows well covered with black tape, and it is necessary to advance the film blindly with a couple of turns each time to keep the frames separated. What you get with this technique is an image that extends out over the sprocket holes. In addition to the graphic interest this produces, I think it is also a useful way to help create a link between pictures in a series. An example of this can be seen in a roll from the Dolly shot along Route 66 in Albuquerque.


Certo Dolly Supersport, 35mm film