Showing posts with label 620 film. Show all posts
Friday, August 24, 2012
Anscoflex II Origins
Quite a bit of the history of Ansco can be found at Bill's Photo History site, including a well-detailed chronology of the company and a full page of Ansco protoype pictures. The picture below shows some color treatments which Ansco considered for the Anscoflex II before settling on the basic gray of the the production model.
Tuesday, January 24, 2012
Kodak Duo Six-20
![]() |
| San Felipe de Neri Church, built 1793 |
The materials and construction quality of the camera is first-rate throughout. The lens and shutter at this point in time may need light cleaning, but the camera's basic simplicity makes serious problems unlikely. Aside from the need to re-roll 120 film onto 620 spools, about the only problem that is likely to arise is with the long mechanical linkage of the shutter release. Extending the lens to the closest focusing position may push the shutter release lever beyond the reach of the linking lever and lead to additional alignment problems. On my camera, I have also found that I need to avoid closing the front door with the shutter cocked as the cocking lever may get hung up on the door latch.
Labels:
620 film,
Albuquerque,
Fuji Acros,
Kodak Duo Six-20,
Plaza Vieja
Sunday, January 08, 2012
Tuesday, November 29, 2011
Monday, November 07, 2011
El Día De Los Muertos
The yearly Marigold Parade in Albuquerque's South Valley celebrates the Day of the Dead.

It was a nice excuse to try out my newly-acquired Ansco Panda, a diminutive plastic wonder that produces 6x6cm images on 620 rollfilm.

The Panda is constructed with a wrap-around-style film frame which reduces the dimensions of the box camera to the smallest possible size. A curved film plane helps image sharpness, and a short 50-60mm focal length means you can get everything in sharp focus from six feet to infinity.


Below are all the cameras in my collection that require the use of 620 roll film. The Vigilant on the left and the Monitor on the right yield 6x9cm negatives, while all the rest including the Panda produce 6x6cm squares. While each of these cameras is capable of producing excellent images, the most surprisingly good is the ultra-simple Panda, which is hardly larger than a Baby Brownie.

The 620 format has been extinct since the mid-'90s, but it is possible to use 120 film in the 620 cameras if you trim down the rims of the 120 spools or re-roll the 120 film onto the old metal 620 spools. On my vintage cameras web site you will find a page on trimming 120 spools and another on my blog illustrating re-spooling 120 to 620 reels.

It was a nice excuse to try out my newly-acquired Ansco Panda, a diminutive plastic wonder that produces 6x6cm images on 620 rollfilm.

The Panda is constructed with a wrap-around-style film frame which reduces the dimensions of the box camera to the smallest possible size. A curved film plane helps image sharpness, and a short 50-60mm focal length means you can get everything in sharp focus from six feet to infinity.


Below are all the cameras in my collection that require the use of 620 roll film. The Vigilant on the left and the Monitor on the right yield 6x9cm negatives, while all the rest including the Panda produce 6x6cm squares. While each of these cameras is capable of producing excellent images, the most surprisingly good is the ultra-simple Panda, which is hardly larger than a Baby Brownie.

The 620 format has been extinct since the mid-'90s, but it is possible to use 120 film in the 620 cameras if you trim down the rims of the 120 spools or re-roll the 120 film onto the old metal 620 spools. On my vintage cameras web site you will find a page on trimming 120 spools and another on my blog illustrating re-spooling 120 to 620 reels.
Tuesday, April 12, 2011
Progress
The brilliant viewfinder makes the Argoflex Forty one of my favorites. I also like it for its stealth factor -- though it looks like a cheap box camera, it has very nice picture-making capabilities due to its coated, focusable lens and reliable shutter. I haven't shot the camera much yet due to an intermittent light leak, but today I figured out that the leak was in the vicinity of the back hinge, and a strip of black tape took care of the problem.


Labels:
620 film,
Albuquerque,
Argoflex Forty,
hc-110,
Tmax 100
Thursday, December 03, 2009
120 to 620
There are a lot of fine old cameras, mostly made by Kodak, that were designed to use the now-defunct 620 rollfilm format. Many of those cameras can be used today with still-available 120 film. Sometimes, the ends of the film spool will need to be trimmed down to get it to fit in the film compartment of the camera. I was content to use that method until I acquired some cameras such as the superlative Kodak Duo Six-20 which has a film compartment that is just too small to admit even a trimmed down 120 spool. With an otherwise unusable fine camera as motivation, I was able to overcome my own resistance to rerolling 120 onto 620 reels.
To get started you will need a fresh roll of 120 film, two old metal 620 reels which are just a little smaller than the modern plastic 120 reels, and a dark film changing bag which is normally used for daylight loading of film into sheet-film holders or developing cannisters.
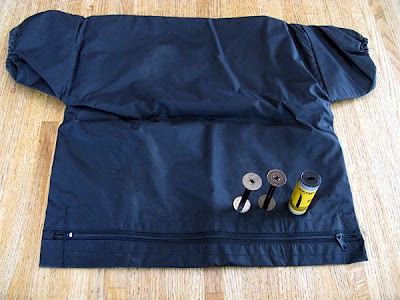
Peel off the paper retaining strip from the film roll and insert the tapered end of the backing paper squarely into the longest slot in the first 620 reel. Roll enough of the backing paper onto the reel so that it will all stay in place when you lay it down inside the dark bag. Now, place everything including the second empty 620 reel inside the bag, zip it up and put your hands in through the elastic-cuffed sleeves of the bag. Everything from here on is done in total darkness.
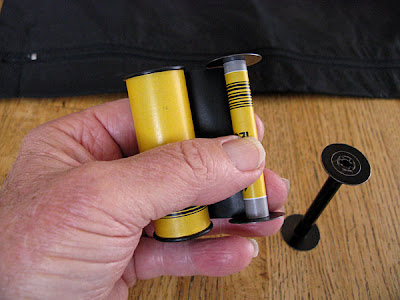
Take up the slack and start rolling the backing paper further on to the 620 reel. Maintain some tension with your fingers on both reels so that the film winds on smoothly but do not use excessive force which could damage the film emulsion. If you feel uncertain about the process, it would be worthwhile to sacrifice a roll of film to practice the procedure in daylight once to get the feel of it.
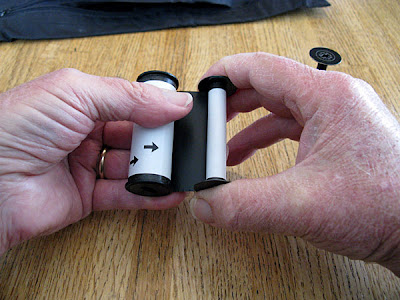
After you have rolled about a foot of the backing paper onto the 620 reel you will come to the beginning of the actual film with is attached to the backing paper with a strip of tape. Just keep right on, smoothly rolling the backing paper and attached film onto the 620 reel.
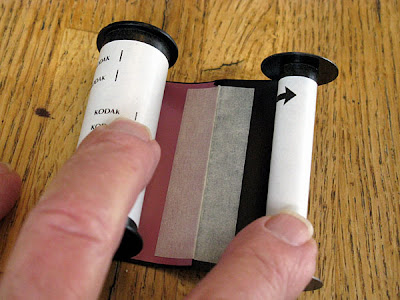
When you get to the end you will have another retaining strip hanging off the end of the backing paper which is normally used to secure the roll after you have removed it from the camera. I generally just leave that alone, though you could tear it off at that point and just use a rubber band to secure the roll if necessary until it is processed.
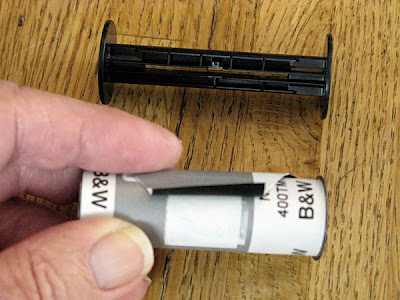
Set aside the plastic 120 reel, pick up the second empty 620 reel and thread the tapered end of the backing paper into the long slot as before. You should be able to distinguish the long slot from the short one by running your fingertip along the shaft of the reel. Be sure the paper is squarely centered in the reel and start winding again while maintaining some tension.
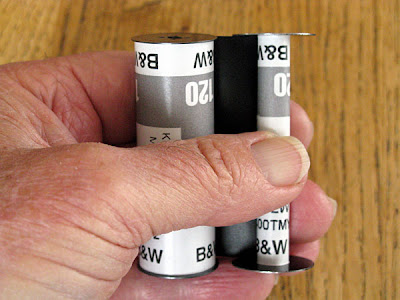


Continue rolling on the film and backing to the end and you have your roll of film ready for loading into your 620 camera. If you need to store the film, put a rubber band around the roll to keep it secured, and store it in a dark container. If you are going to have someone else process your film, be sure to tell them that you need to get your 620 reel back with the negatives.
To get started you will need a fresh roll of 120 film, two old metal 620 reels which are just a little smaller than the modern plastic 120 reels, and a dark film changing bag which is normally used for daylight loading of film into sheet-film holders or developing cannisters.

Peel off the paper retaining strip from the film roll and insert the tapered end of the backing paper squarely into the longest slot in the first 620 reel. Roll enough of the backing paper onto the reel so that it will all stay in place when you lay it down inside the dark bag. Now, place everything including the second empty 620 reel inside the bag, zip it up and put your hands in through the elastic-cuffed sleeves of the bag. Everything from here on is done in total darkness.

Take up the slack and start rolling the backing paper further on to the 620 reel. Maintain some tension with your fingers on both reels so that the film winds on smoothly but do not use excessive force which could damage the film emulsion. If you feel uncertain about the process, it would be worthwhile to sacrifice a roll of film to practice the procedure in daylight once to get the feel of it.

After you have rolled about a foot of the backing paper onto the 620 reel you will come to the beginning of the actual film with is attached to the backing paper with a strip of tape. Just keep right on, smoothly rolling the backing paper and attached film onto the 620 reel.

When you get to the end you will have another retaining strip hanging off the end of the backing paper which is normally used to secure the roll after you have removed it from the camera. I generally just leave that alone, though you could tear it off at that point and just use a rubber band to secure the roll if necessary until it is processed.

Set aside the plastic 120 reel, pick up the second empty 620 reel and thread the tapered end of the backing paper into the long slot as before. You should be able to distinguish the long slot from the short one by running your fingertip along the shaft of the reel. Be sure the paper is squarely centered in the reel and start winding again while maintaining some tension.

You will soon come to the end of the film which is free and not taped to the backing paper as is the other end. You may not immediately detect the film end, but you will feel the stiff and slick surface as distinct from the backing paper. You will need to tuck the free end of the film under the rolled backing paper, and then continuing rolling on, maintaining appropriate tension.
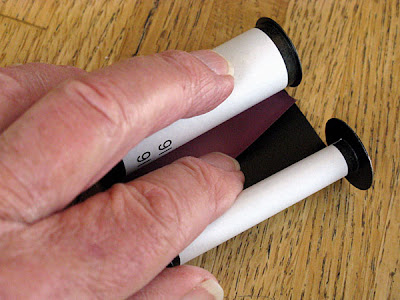
About a foot from finishing, you will again encounter the end of the film that is taped onto the backing paper. At this point, some people recommend carefully peeling off the tape and repositioning it to remove any buckling of the film that has been created by the rolling process. I have not found that to be necessary, possibly because the use of two 620 spools in the process seems to avoid the buckling problem.
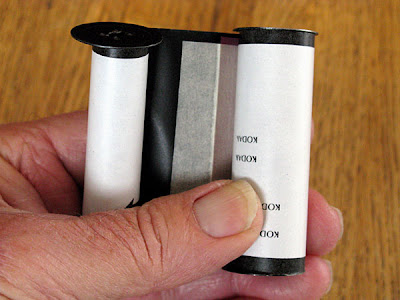
Continue rolling on the film and backing to the end and you have your roll of film ready for loading into your 620 camera. If you need to store the film, put a rubber band around the roll to keep it secured, and store it in a dark container. If you are going to have someone else process your film, be sure to tell them that you need to get your 620 reel back with the negatives.
I continued for a time to use trimmed 120 reels in my cameras which would permit that. However, the rerolled film on 620 reels tends to advance much more smoothly in any of the cameras designed for the format, and I now use only the rerolling method.
Wednesday, December 02, 2009
Beemer at the Bosque

I have added an article about the Argoflex Forty to my vintage cameras web site.
The post-war Argus medium format cameras were designed to take Kodak's 620 rollfilm, and there seems to be no way to jam a 120 cartridge into the film chamber. That is really not a big problem as re-rolling 120 film onto an old 620 spool is an easy five-minute job. An additional perk is that the Argoflex and a lot of other very nice 620-format cameras can be picked up for just a few dollars.
My camera, for which I think I paid about ten bucks, arrived ready to shoot except for slightly slow shutter speeds. A couple drops of lighter fluid through the side of the shutter housing fixed that. I also made a lens cap from the chopped-off bottom of a 35mm film cannister. It's a great little shooter.
Sunday, October 25, 2009
Tuesday, May 12, 2009
Cars & Bikes


This is one of the first car shows of the year in Albuquerque. Besides being cheap fun, they are also a good opportunity to try out a variety of photo equipment and techniques. These pictures were made with the Hawkeye Flash box camera with its lens reversed.
Monday, March 09, 2009
Sunday morning at UNM


This is the first color I have shot in one of my Brownie Hawkeye Flash box cameras, and maybe only the second roll of color in any of my medium-format cameras. Cost is always a concern, but finding a lab to do a decent job on the processing is an even bigger challenge. I got some free film recently which took care of part of the cost issue, and the processing was done at Picture Perfect in Albuquerque which does the work all by hand. I'm favorably impressed by the results, though I wish they weren't located clear across town.


This is the first color I have shot in one of my Brownie Hawkeye Flash box cameras, and maybe only the second roll of color in any of my medium-format cameras. Cost is always a concern, but finding a lab to do a decent job on the processing is an even bigger challenge. I got some free film recently which took care of part of the cost issue, and the processing was done at Picture Perfect in Albuquerque which does the work all by hand. I'm favorably impressed by the results, though I wish they weren't located clear across town.
Subscribe to:
Posts (Atom)


